通常のウィンドウではなく、非矩形ウィンドウや背景を画像にしたりする方法です。
以下では、めんどくささに応じて筆者がLv.1~4と勝手に分けています。
スタイルいじり Lv.1
Lv.1はプロパティを設定するだけで適用できる項目です。
非矩形ウィンドウを作成するには
手っ取り早く作るには、まず型抜き用画像を作成します。
型抜き用画像は、ウィンドウの形状を表す部分を描画した画像で、それ以外のところを透過ピクセルにします。
したがって、型抜き用画像は透過(アルファチャンネル)をサポートしたフォーマットで保存する必要があります。
筆者は、Inkscapeでウィンドウの形状を描画して、PNGにエクスポートする方法をお勧めします。
型抜き画像ができたら、ウィンドウクラスのコンストラクタに以下のように適用します。
以下の例ではQDialogクラスに適用しています。
   1:
   2: MainDlg::MainDlg(void)
   3: {
   4: 	Qt::WindowFlags flags = Qt::Dialog | Qt::MSWindowsFixedSizeDialogHint | Qt::FramelessWindowHint;
   5: 	setWindowFlags( flags );
   6: 	QPixmap pixmap( "window.png" );
   7: 	setMask( pixmap.mask() );
   8:
   9: 	// 型抜き画像のサイズに合わせる
  10: 	resize( 300, 300 );
  11: }
ウィジェットの外観を設定するには
例として、ダイアログの背景色を設定したい場合は、以下のコードをダイアログクラスのコンストラクタに記述します。
	// 背景色を設定する
	setStyleSheet( "* {background-color : rgb( 255, 255, 128 )}" );

	// 透過率を設定する
	setWindowOpacity( 0.7 );
この種の設定はQtDesignerから行うことができます。
ウィジェットを選択して、プロパティエディタの一覧から”styleSheet”の項目の右側にあるボタンを押します。
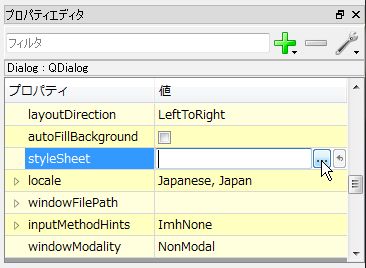
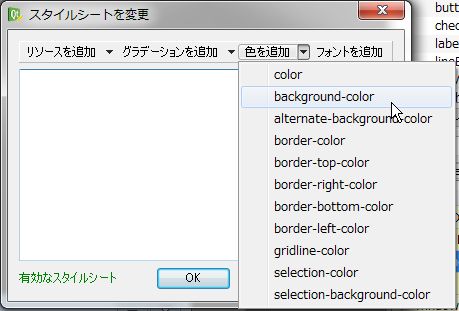
選択すると以下のようなダイアログが起動します。「***を追加」の右側にある”▼”を押すと、追加するQSSプロパティ一覧が表示されるので、
追加したい項目を選択し、設定を行います。
スタイルいじり Lv.2
以下のコードはQtに付属しているサンプルコードの、examples/widgets/stylesheetを参考にしています。
Lv.1のスタイルシートは個別のウィジェットごとの設定でしたが、アプリケーション全体で共通のスタイルシート(QSS)を作成することで外見を統一することができます。
QSSの設定では、基本的にはウィジェットの種類ごとにスタイルシートを設定するようです。
書式や構文はCSSとほぼ同じようです。
QPushButtonの設定例
QPushButton {
    background-color: #000088;
    border-color: #000044;
    border-style: solid;
    border-radius: 5;
}

QPushButton:hover {
   background-color: #880000;
}

QPushButton:pressed {
    background-color: #008800;
}
ファイルを作成したら、その内容をQApplication::setStyleSheet()関数で適用します。
通常QApplicationオブジェクトがシングルトンとして作成されているかと思われますので、
そのオブジェクトから呼び出すと良いでしょう。
また、QSSファイルはリソースとして登録しておくと便利です。
以下のコードはmain()関数内で設定する例です。
   1:
   2: #include "MainDlg.h"
   3: #include <QtCore>
   4:
   5: int main(int argc, char *argv[])
   6: {
   7:     QApplication app(argc, argv);
   8:
   9: 	QFile file( ":/qss/dialog.qss" );
  10: 	file.open( QFile::ReadOnly );
  11: 	QString strStyles = QLatin1String( file.readAll() );
  12:
  13: 	app.setStyleSheet( strStyles );
  14:
  15: 	MainDlg dlg;
  16:
  17: 	dlg.show();
  18:
  19:     return app.exec();
  20: }
QSSは他にも筆者にとって謎のクラスやセレクタがあります。
スタイルいじり Lv.3
以下のコードはQtに付属しているサンプルコードの、examples/widgets/stylesを参考にしています。
Lv.3は、自作のQStyle派生クラスを作成する必要がある項目のうち、比較的簡単に設定可能な項目です。
QStyle派生クラスはいくつか用意されていて、OSによって使用できるものが決まっているようです。
ここではexamples/widgets/stylesに合わせてQMotifStyleの派生クラスとしています。
スタイルクラスはウィンドウの外見を詳細に設定することができます。
設定後、ウィンドウクラスのコンストラクタで、
QApplication::setStyle( new MyStyle );
のようにして適用します。
ウィンドウの背景を画像にするには
まず、polish()関数を以下のようにオーバーライドします。
また、画像を設定するためのsetTexture()という関数を作成します(関数名は任意)。
   1: #pragma once
   2:
   3: #include <QtGui/QMotifStyle>
   4:
   5:
   6: class MyStyle :	public QMotifStyle
   7: {
   8: public:
   9: 	MyStyle(void);
  10: 	~MyStyle(void);
  11:
  12: 	void polish( QPalette &palette );
  13:
  14: private:
  15:     static void setTexture(QPalette &palette, QPalette::ColorRole role,
  16:                            const QPixmap &pixmap);
  17: };
これらの関数内で、以下のように設定します。
   1: void MyStyle::polish( QPalette &palette )
   2: {
   3: 	QPixmap backgroundImage( "window.png" );
   4: 	setTexture( palette, QPalette::Window, backgroundImage );
   5: }
   6:
   7:
   8: void MyStyle::setTexture(QPalette &palette, QPalette::ColorRole role,
   9:                            const QPixmap &pixmap)
  10: {
  11: 	for (int i = 0; i < QPalette::NColorGroups; ++i) {
  12: 		QColor color = palette.brush(QPalette::ColorGroup(i), role).color();
  13: 		palette.setBrush(QPalette::ColorGroup(i), role, QBrush(color, pixmap));
  14: 	}
  15: }
背景画像は前記の型抜き画像としても利用することができます。
すなわち、背景用画像と型抜き用画像の2つを用意する必要はありません。
ボタンのスタイルを変更する
上記polish()関数でボタンのスタイルを変更することができます。
上記のコードのpolish()に以下のコードを追加します。
   1: void MyStyle::polish( QPalette &palette )
   2: {
   3: 	QPixmap backgroundImage( "window.png" );
   4:
   5: 	// 追加部分:ボタンスタイルを変更
   6: 	palette = QPalette( QColor( 0, 0, 0, 50 ) );
   7: 	palette.setBrush(QPalette::ButtonText, Qt::cyan);
   8:
   9: 	setTexture( palette, QPalette::Window, backgroundImage );
  10: }
  11:
6行目QPaletteクラスのコンストラクタはボタンの色を定義する仕様になっています。
ウィンドウやコントロールの設定箇所はQPaletteクラスリファレンスを参照してください。
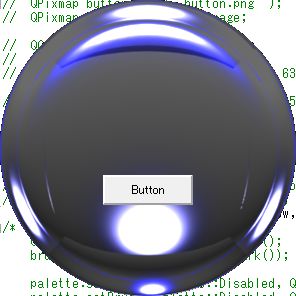
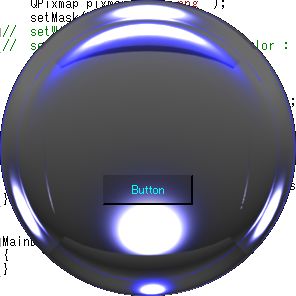
設定前と設定後
さらにボタンの背景を画像にするには以下のようにします。
   1: void MyStyle::polish( QPalette &palette )
   2: {
   3: 	QPixmap backgroundImage( "window.png" );
   4:
   5: 	// 追加部分:ボタンの背景を画像にする場合
   6: 	QPixmap buttonImage( "button.png" );
   7: 	// 追加部分:ボタンが押されたときの背景
   8: 	QPixmap midImage = buttonImage;
   9:
  10: 	setTexture( palette, QPalette::Button, buttonImage );
  11: 	setTexture( palette, QPalette::Mid, midImage );
  12: 	setTexture( palette, QPalette::Window, backgroundImage );
  13: }
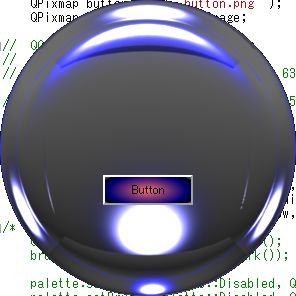
ボタンの背景を画像にした結果
スタイルいじり Lv.4
この項目もQtに付属しているサンプルコードの、examples/widgets/stylesを参考にしています。
Lv.4はウィジェットの背景やテキストの色だけではなく、形状までいじる方法です。
その場合、ウィジェットの形状をプログラム側で全て記述する必要があるので、大変です。
例えば、ボタンの形状を変更したい場合、外形を描画するだけでは不足で、
ボタンが立体的に見えるように陰影の描画、さらに押されたときとそうでないときの陰影の変化なども記述する必要があります。
もしかしたらQSS+背景画像で形状も設定できるのかもしれません。
ウィジェットの形状を記述するには、QStyle::drawPrimitive()関数をオーバーライドします。
以下の例はボタンの形状を変更する例ですが、ほとんどexamples/widgets/styles/norwegianwoodstyle.cppから取っています。
どれだけめんどくさいかお分かりいただけるでしょう。
   1:
   2: void MyStyle::drawPrimitive(PrimitiveElement element,
   3:                      const QStyleOption *option,
   4:                      QPainter *painter,
   5:                      const QWidget *widget) const
   6: {
   7:   switch (element)
   8:   {
   9:   // ウィジェットの種類ではなくPrimitiveの種類で指定する
  10:   case PE_PanelButtonCommand:
  11:     {
  12:       int delta = (option->state & State_MouseOver) ? 64 : 0;
  13:       QColor slightlyOpaqueBlack(0, 0, 0, 63);
  14:       QColor semiTransparentWhite(255, 255, 255, 127 + delta);
  15:       QColor semiTransparentBlack(0, 0, 0, 127 - delta);
  16:
  17:       int x, y, width, height;
  18:       option->rect.getRect(&x, &y, &width, &height);
  19:
  20:       // 以下の2行だけ筆者が記述
  21:       // ボタンの形状を楕円にする
  22:       QPainterPath path;
  23:       path.addEllipse( option->rect );
  24:
  25:
  26:       // これ以降はコピー
  27:       // ボタンが押されたときとそうでないときの陰影などが記述されているが、
  28:       // すばらしいことに色々な形状に対応している様子
  29:       int radius = qMin(width, height) / 2;
  30:
  31:       QBrush brush;
  32:       bool darker;
  33:
  34:       const QStyleOptionButton *buttonOption =
  35:           qstyleoption_cast<const QStyleOptionButton *>(option);
  36:       if (buttonOption
  37:           && (buttonOption->features & QStyleOptionButton::Flat)) {
  38:         brush = option->palette.background();
  39:         darker = (option->state & (State_Sunken | State_On));
  40:       } else {
  41:         if (option->state & (State_Sunken | State_On)) {
  42:           brush = option->palette.mid();
  43:           darker = !(option->state & State_Sunken);
  44:         } else {
  45:           brush = option->palette.button();
  46:           darker = false;
  47:         }
  48:       }
  49:
  50:       painter->save();
  51:       painter->setRenderHint(QPainter::Antialiasing, true);
  52:       painter->fillPath(path, brush);
  53:       if (darker)
  54:         painter->fillPath(path, slightlyOpaqueBlack);
  55:
  56:       int penWidth;
  57:       if (radius < 10)
  58:         penWidth = 3;
  59:       else if (radius < 20)
  60:         penWidth = 5;
  61:       else
  62:         penWidth = 7;
  63:
  64:       QPen topPen(semiTransparentWhite, penWidth);
  65:       QPen bottomPen(semiTransparentBlack, penWidth);
  66:
  67:       if (option->state & (State_Sunken | State_On))
  68:         qSwap(topPen, bottomPen);
  69:
  70:       int x1 = x;
  71:       int x2 = x + radius;
  72:       int x3 = x + width - radius;
  73:       int x4 = x + width;
  74:
  75:       if (option->direction == Qt::RightToLeft) {
  76:         qSwap(x1, x4);
  77:         qSwap(x2, x3);
  78:       }
  79:
  80:       QPolygon topHalf;
  81:       topHalf << QPoint(x1, y)
  82:           << QPoint(x4, y)
  83:           << QPoint(x3, y + radius)
  84:           << QPoint(x2, y + height - radius)
  85:           << QPoint(x1, y + height);
  86:
  87:       painter->setClipPath(path);
  88:       painter->setClipRegion(topHalf, Qt::IntersectClip);
  89:       painter->setPen(topPen);
  90:       painter->drawPath(path);
  91:
  92:       QPolygon bottomHalf = topHalf;
  93:       bottomHalf[0] = QPoint(x4, y + height);
  94:
  95:       painter->setClipPath(path);
  96:       painter->setClipRegion(bottomHalf, Qt::IntersectClip);
  97:       painter->setPen(bottomPen);
  98:       painter->drawPath(path);
  99:
 100:       painter->setPen(option->palette.foreground().color());
 101:       painter->setClipping(false);
 102:       painter->drawPath(path);
 103:
 104:       painter->restore();
 105:     }
 106:     break;
 107:
 108:   // ボタン以外はMotifStyleの形状を採用
 109:   default:
 110:     QMotifStyle::drawPrimitive(element, option, painter, widget);
 111:   }
 112: }
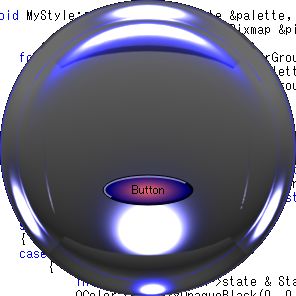
実行結果
スタイルの設定は他にもいろいろあります。
行き当たり次第追加していきたいと思います。
